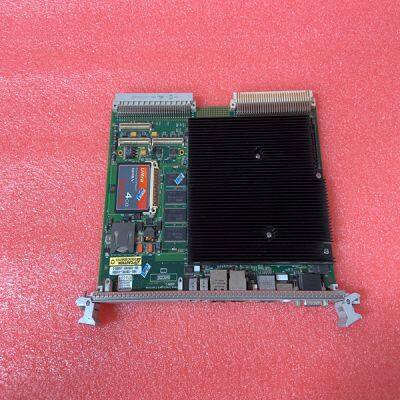
VME-7807RC VME-7807RC-410000 350-930078074-410000 G
Product Details
Product Details
Product Description
Product DescriptionBrand:GE
Type:VME-7807RC VME-7807RC-410000
Origin: the United States
Warranty: 365 days
Colour: new/used
Shipping method: Courier delivery
Spare parts spare parts, the main DCS control system of PLC system and the robot system spare parts,
Brand advantage: Allen Bradley, BentlyNevada, ABB, Emerson Ovation, Honeywell DCS, Rockwell ICS Triplex, FOXBORO, Schneider PLC, GE Fanuc, Motorola, HIMA, TRICONEX, Prosoft etc. Various kinds of imported industrial parts
Importing the Add-On Instruction 1 Open the application in Studio 5000. 2 Expand the TASKS folder, and expand the MAINTASK folder. 3 Expand the MAINPROGRAM folder. The MAINROUTINE contains rungs of logic. The very last rung in this routine is blank. This is where you can import the Add-On Instruction. Note: You can place the Add-On Instruction in a different routine than the MainRoutine. Make sure to add a rung with a jump instruction (JSR) in the MainRoutine to jump to the routine containing the Add-On Instruction. 4 Right-click an empty rung in the routine and choose IMPORT RUNGS.
Select the .L5X file that you exported from PCB (Creating and Exporting the .L5X File (page 24)). This opens the Import Configuration dialog box. Click TAGS under MAINROUTINE to display the controller tags in the Add-On Instruction. Note: If you are using RSLogix version 16 or earlier, the Import Configuration dialog box does not contain the Import Content tree.
If the module is not located in the default slot (or is in a remote rack), edit the connection input and output variables that define the path to the module in the FINAL NAME column (NAME column for RSLogix version 16 or less). For example, if your module is located in slot 3, change Local:1:I in the FINAL NAME column to Local:3:I. Do the same for Local:1:O. Note: If your module is located in Slot 1 of the local rack, this step is not required. 7 Click OK to confirm the import. 8 When the import is completed, the new rung with the Add-On Instruction is visible.
Adding Multiple Modules in the Rack (Optional) Important: This procedure is for multiple MVI69E-MBS modules running in the same CompactLogix or MicroLogix 1500-LRP rack. You can add additional modules of the same type to the rack. 1 Add a new MVI69E-MBS module to the ProSoft Configuration Builder (PCB) project. 2 Export the module configuration as an L5X file. 3 Add a new MVI69E-MBS to the Studio 5000 project. 4 Import the .L5X file into Studio 5000 for the new module as an Add-On Instruction. 2.5.1 Adding Another Module in PCB 1 Start ProSoft Configuration Builder. 2 Right click DEFAULT LOCATION (which you can rename) and choose ADD MODULE. 3 Right-click NEW MODULE and choose CHOOSE MODULE TYPE. 4 In the Choose Module Type dialog box, select MVI69E in the PRODUCT LINE FILTER area, and then select MVI69E-MBS as the MODULE TYPE. Click OK. 5 Select the MVI69E-MBS module in the tree and repeat the above steps to add a second (or more) module in the PCB project.
>> 2 in 1 Snack Tumbler Reusable BPA Free Insulated Double Wall Plastic Snack & Drinking Cup with Lid
>> Romanso China Industrial LED Switchable Wattage High Bay Light
>> Factory Price Custom Storage Foldable Toy Garment Gift Box with Sport UV
>> Good Quality Outdoor Aluminum Steel Industrial Storage Warehouse Beautiful Large Tent
>> 20-200mm PE Pipe Cod Cable Porous Pipe Production Line Plastic Carbon Spiral Pipe Conduit Tube Making Machine
>> 30MW Output Wind Turbine Rotor Aluminum Blade Steel Hub Tower Wind Plant Larger Wingspan to Sweap Produced on Site Eliminating Transportation Limits Wt30MW8
>> Power Station 1kw 3kw 5kw Solar Portable Generator Panels Energy System Lithium Battery Bank
>> Hot - Selling AC Gym Equipment Commercial Treadmill with TV (JB-8900)
>> Suspension Parts Ball Joint (43330-19095) for Toyota Suspension Corolla Ae10
>> Hlc500 Machining Center Milling Machine Hmc500 CNC Horizontal Machining Center
>> Factory Directly Provide Manufacturer 4040 4 Inch Ro Membrane Filter Housing 8040 membrane housing for reverse osmosis
>> ABB YPQ101E Module card parts inventory
>> Promotional Custom PVC Inflatable Beach Ball
>> Track Mobile Diesel Horizontal Grinder Drum Wood Chipper
>> Single Needle Duvet Quilting Machine
>> Durable Anti-Corrosive Roofing Materials for Residential Buildings
>> Security Hologram Void Logo Sticker, Warranty Void if Removed
>> Ocean Lighting Interior Decor Modern Luxury Restaurant Chandelier Lighting Black
>> Tunnel Concrete Construction Belt Grouting Machine
>> Air Filter 6I-2501 for CATTractors
>> Hebei Chengheng Practical 700/900mm Plastic shopping T-Shirt /Flat Bags HDPE/LDPE Blown Film Extrusion Machine
>> Marble Tile Pattern White Soft Light Fish Belly White Floor Tiles All Porcelain 1200X2400 Living Room
>> Stove Factory Supply High Quality Indoor Cast Steel Wood Burning Stove
>> Wholesale Inflatable Rock Star Toy Set Roll Party Supplies Kids Inflatable Toys
>> 2020 New Fashion Leggings Women Slim Fitness High Waist Elastic Workout Leggings for Gym Sport
>> Plastic Extrusion Machine Zjf Series Plastic Powder Charger Plastic Spring Loader
>> Square Oval Round Tube Mill Machine for Precision Iron Steel ERW Pipe Making
>> Suntech MIG/CO2/Saw Welding Wire Production Copper Coating Line Machine
>> Professional Three Row Drill for Wood Crafting Projects
>> 1612854180 Car front bumper skin Auto parts front bumper skin for peugeot 508 (W23R) 2015